When your client-side (frontend) application is integrated with Stigg it uses the publishable key, which is publicly accessible to anyone.
While the Stigg platform limits access for that API key to a minimum, some sensitive data may still be accessible by a malicious actor (e.g. by guessing customer ID).
It’s highly recommended to prevent any un-authenticated access to data using the publishable key, by configuring Stigg to verify the identity of requests that originate from your client-side application.
Verification is achieved using the HMAC SHA256 algorithm.
How does hardening work?
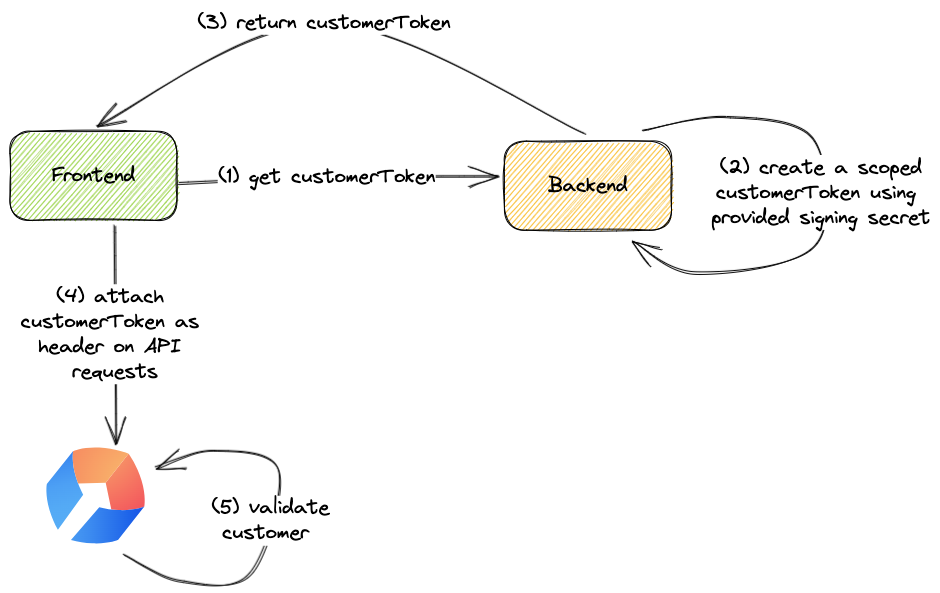 As a prerequisite, inject a signing secret obtained from Stigg into your backend application.
When a user logs in to your application (step 1), your backend application should create a customer token (step 2) and return it as part of the response (step 3).
When initializing the Stigg SDK on the frontend, in addition to the customer ID include the customer token. Both properties will be automatically sent to the Stigg backend upon every request (step 4).
Stigg would then leverage the provided information to verify the customer identity.
As a prerequisite, inject a signing secret obtained from Stigg into your backend application.
When a user logs in to your application (step 1), your backend application should create a customer token (step 2) and return it as part of the response (step 3).
When initializing the Stigg SDK on the frontend, in addition to the customer ID include the customer token. Both properties will be automatically sent to the Stigg backend upon every request (step 4).
Stigg would then leverage the provided information to verify the customer identity.
How can I enable hardening?
Copy the signing secret from the Stigg app
In the Stigg app, navigate to the Account Settings screen.
Under the Environments section, click on the button that appears under the Client-side Security column of the relevant environment - if hardening is not enabled it will appear as “Not enforced”.
Copy the signing secret.
The signing secret is specific per environment.
Generate a customer token in your backend application
In your backend application, identify the handler that returns the user identity to the client side.
Generate a customer token using the provided singing secret, for example:
import { createHmac } from 'crypto';

export function createCustomerToken(customerId: string, signingSecret: string): string {
  const signature = createHmac('sha256', signingSecret).update(customerId).digest('hex');
  return `HMAC-SHA256 ${customerId}:${signature}`;
}
import org.apache.commons.codec.binary.Hex;

import javax.crypto.Mac;
import javax.crypto.spec.SecretKeySpec;
import java.nio.charset.StandardCharsets;

public class StiggTokenGenerator {
  public static String createCustomerToken(String customerId, String signingSecret) {
    try {
      Mac sha256Hmac = Mac.getInstance("HmacSHA256");
      SecretKeySpec secretKey = new SecretKeySpec(signingSecret.getBytes(StandardCharsets.UTF_8), "HmacSHA256");
      sha256Hmac.init(secretKey);

      byte[] hashedBytes = sha256Hmac.doFinal(customerId.getBytes(StandardCharsets.UTF_8));
      String signature = Hex.encodeHexString(hashedBytes);

      return "HMAC-SHA256 " + customerId + ":" + signature;
    } catch (Exception e) {
      throw new RuntimeException("Failed to generate customer token", e);
    }
  }
}
For improved security, especially in scenarios where frontend tokens should be short-lived, we recommend using expiring customer tokens. Provide the customer token in your frontend application
In your frontend application pass the customerToken to the Stigg provider.
import { useStiggContext } from '@stigg/react-sdk';

function App() {
  const { stigg } = useStiggContext();

  useEffect(() => {
    var customerId = ...
    var customerToken = ...

    // call stigg.setCustomerId after the users signs in
    stigg.setCustomerId(customerId, customerToken);
  })
}
Enable client-side security enforcement in the Stigg app
In the Stigg app, navigate to the Account Settings screen.
Under the Environments section, click on the button that appears under the “Client-side security” column of the relevant environment - when hardening is not enabled it will appear as “Not enforced”.
Set the “Client-side security status” to “Enforced”.
Save the changes.
Confirm the change.
It’s recommended to enable client-side security in each environment in a similar manner to deployment of new functionality in your application, for example: start with development, then enable in staging, and only lastly enable in production.
If client-side security is enforced and the above mentioned code changes have not been made, access to Stigg from the frontend application will not work.
Read-only access
Stigg allows you to easily add checkout experiences in your application using an embeddable checkout widget.
In this flow, the Stigg frontend SDKs can initiate a checkout session directly against the Stigg backend; thus, saving you the need to create a dedicated “checkout” endpoint in your backend.
Consequently, this means that the Stigg frontend SDKs can perform write operations in the Stigg platform.
When stricter access is required, it’s possible to limit the frontend SDKs to read-only access by adding a ro: prefix to the generated customer token.
import { createHmac } from 'crypto';

export function createCustomerToken(customerId: string, signingSecret: string): string {
  const payload = `ro:${customerId}`;
  const signature = createHmac('sha256', signingSecret).update(payload).digest('hex');
  return `HMAC-SHA256 ${payload}:${signature}`;
}
import org.apache.commons.codec.binary.Hex;

import javax.crypto.Mac;
import javax.crypto.spec.SecretKeySpec;
import java.nio.charset.StandardCharsets;

public class StiggTokenGenerator {
  public static String createCustomerToken(String customerId, String signingSecret) {
    try {
      Mac sha256Hmac = Mac.getInstance("HmacSHA256");
      SecretKeySpec secretKey = new SecretKeySpec(signingSecret.getBytes(StandardCharsets.UTF_8), "HmacSHA256");
      sha256Hmac.init(secretKey);

      String payload = "ro:" + customerId;
      byte[] hashedBytes = sha256Hmac.doFinal(payload.getBytes(StandardCharsets.UTF_8));
      String signature = Hex.encodeHexString(hashedBytes);

      return "HMAC-SHA256 " + payload + ":" + signature;
    } catch (Exception e) {
      throw new RuntimeException("Failed to generate customer token", e);
    }
  }
}
The [Stigg Checkout Widget}(checkout) will not work when read-only permissions are used.
Token expiration
Stigg supports expiring customer tokens. If you want tighter client-side security, you can add an exp: prefix to the token payload to define a hard expiration time.
The exp value must be exactly 10 digits and represents Unix time in seconds (UTC), which is seconds since January 01 1970.
When using expiration, the token payload must follow this order:
exp:<10-digit-unix-seconds> must be first.ro: is optional and must be after exp.customerId must be last.
Valid examples:
exp:1776509029:customerIdexp:1776509029:ro:customerId
Invalid example (wrong order):
ro:exp:1776509029:customerId
If exp is more than 10 digits (for example, too far into the future), the token is considered invalid format.
Errors
If the token is expired, Stigg returns Customer token has expired. For example:
{
  "errors": [
    {
      "message": "Customer token has expired",
      "extensions": {
        "isValidationError": true,
        "code": "Unauthenticated",
        "traceId": "49239034-c6d4-49f1-9477-6fe04b62092a"
      }
    }
  ],
  "data": null
}
{
  "errors": [
    {
      "message": "Customer token has invalid format",
      "extensions": {
        "isValidationError": true,
        "code": "Unauthenticated",
        "traceId": "79a06a2d-874b-4a5c-8acb-fe85107eecd0"
      }
    }
  ],
  "data": null
}