> ## Documentation Index
> Fetch the complete documentation index at: https://docs.stigg.io/llms.txt
> Use this file to discover all available pages before exploring further.
# Snowflake
## Overview
Stigg's integration with Snowflake serves a core principal of granting access to raw data, enabling the creation of customized reporting solutions and fostering informed business decision-making.
Stigg's native integration with Snowflake is included in the Scale plan, and is also available as an optional add-on to the Growth plan. See Stigg's pricing for more details.
Starting October 2025, Snowflake deprecates the creation of new password-based users. Stigg therefore uses RSA key-pair authentication for all new Snowflake connections. Existing password-based connections must migrate to key-pair before Snowflake removes password users in mid-2026.
## Available data types
Stigg's integration with Snowflake allows you to sync the following Stigg entities to Snowflake:
1. Product catalog
* Products
* Plans
* Add-ons
* Features
2. Customers
3. Subscriptions
## Setting up the integration
### Prerequisites
To setup the integration, a Snowflake account with the [ACCOUNTADMIN](https://docs.snowflake.com/en/user-guide/security-access-control-considerations.html) role. If you don’t have an account with the ACCOUNTADMIN role, contact your Snowflake administrator to set one up for you.
Stigg connects to Snowflake using **key-pair authentication** (password authentication is deprecated).\
Follow the steps below to generate the private and public RSA key pair.\*\* You'll use the private key with Stigg, and the public key in Snowflake.\*\*
**These commands use the `openssl` CLI. If you don't have it installed, install it locally or ask your DevOps / infrastructure team to run them for you.**
```bash bash theme={null}
# To generate an unencrypted private key
openssl genrsa 2048 | openssl pkcs8 -topk8 -inform PEM -out rsa_key.p8 -nocrypt
# Or to generate an encrypted private key (recommended)
openssl genrsa 2048 | openssl pkcs8 -topk8 -inform PEM -v2 aes-256-cbc -out rsa_key.p8
# To generate the public key from the private key
openssl rsa -in rsa_key.p8 -pubout -out rsa_key.pub
```
**After running these commands you will have two files:**
**- `rsa_key.p8`: your private key in PKCS#8 format. This is the file you will upload or paste into Stigg when configuring the Snowflake integration.**
**- `rsa_key.pub`: your public key. In the next step, you will copy the Base64 body of this file (without the `-----BEGIN PUBLIC KEY-----` / `-----END PUBLIC KEY-----` lines) into the Snowflake SQL script.**
**If you generated an *encrypted* private key, `openssl` will prompt you to choose a passphrase. Remember this value, as you’ll enter it in the *Passphrase* field in Stigg when connecting to Snowflake.**
In [Snowflake](https://app.snowflake.com/), create the relevant Stigg entities (a role, user, warehouse, database and schema) with the OWNERSHIP permission.
Open a new [Snowflake worksheet](https://docs.snowflake.com/en/user-guide/ui-worksheet.html) and paste the below script:
```sql sql theme={null}
-- set variables (these need to be uppercase)
set export_role = 'STIGG_ROLE';
set export_warehouse = 'STIGG_WAREHOUSE';
set export_database = 'STIGG_DATABASE';
set export_schema = 'STIGG_SCHEMA';
-- set credentials
set export_username = 'STIGG_USER';
set export_public_key = ''; -- base64 content only, no header/footer
begin;
-- create role
use role securityadmin;
create role if not exists identifier ($export_role);
grant role identifier ($export_role) to role SYSADMIN;
-- create user
create user if not exists identifier ($export_username)
default_role = $export_role
default_warehouse = $export_warehouse;
rsa_public_key = $export_public_key;
grant role identifier ($export_role) to user identifier ($export_username);
-- change role to sysadmin for warehouse / database steps
use role sysadmin;
-- create warehouse
create warehouse if not exists identifier ($export_warehouse)
warehouse_size = xsmall warehouse_type = standard
auto_suspend = 60
auto_resume = true
initially_suspended = true;
-- create database
create database if not exists identifier ($export_database);
-- grant warehouse access
grant USAGE
on warehouse identifier ($export_warehouse)
to role identifier ($export_role);
-- grant database access
grant OWNERSHIP
on database identifier ($export_database)
to role identifier ($export_role);
commit;
begin;
USE DATABASE identifier ($export_database);
-- create schema
CREATE SCHEMA IF NOT EXISTS identifier ($export_schema);
commit;
begin;
-- grant schema access
grant OWNERSHIP
on schema identifier ($export_schema)
to role identifier ($export_role);
commit;
```
Replace `` with the base64 content of your rsa\_key.pub file (without the header/footer lines).
When pasting your public key into Snowflake, use **only the Base64-encoded content** of the key.\
Do **not** include the `-----BEGIN PUBLIC KEY-----` or `-----END PUBLIC KEY-----` lines, and ensure there are **no extra spaces or line breaks**.\
Incorrect formatting will prevent the connection from being established.
Run the script, while using the **Run All** option (⌘ + Shift + Enter shortcut in Mac or CTRL + Shift + Enter in Windows).
By default, Snowflake allows users to connect to the service and internal stage from *any* computer or device. A security administrator (or higher) can use a [network policy](https://docs.snowflake.com/en/user-guide/network-policies) to allow or deny access to a request based on its origin.
In this step we'll ensure that Stigg has access to your Snowflake cluster.
In [Snowflake](https://app.snowflake.com/), open a new [worksheet](https://docs.snowflake.com/en/user-guide/ui-worksheet.html) and run the below command:
```sql sql theme={null}
SHOW NETWORK POLICIES;
```
If the returned result is empty, all network access is allowed to your cluster, and specifically Stigg can access it - skip to the next section.
If the returned result is **not** empty, an existing network policy is in place. To ensure that Stigg can access your cluster, update the existing policy and add Stigg's IP addresses to the allowlist using the below command:
```sql sql theme={null}
CREATE NETWORK POLICY $EXPORT_POLICY_NAME ALLOWED_IP_LIST = (
-- Depending on your data residency location, add the following IP addresses to your allowlist:
-- United States:
'34.106.109.131/32',
'34.106.196.165/32',
'34.106.60.246/32',
'34.106.229.69/32',
'34.106.127.139/32',
'34.106.218.58/32',
'34.106.115.240/32',
'34.106.225.141/32',
-- European Union:
'13.37.4.46/32',
'13.37.142.60/32',
'35.181.124.238/32'
);
```
In [Stigg](https://app.stigg.io/), navigate to the Integrations > Apps > Snowflake section.
Enter the below information in the opened form:
| Field | Description |
| ----------------------------------------------------------------------------------------------------- | ------------------------------------------------------------------------------------------------------------------------------------------------------------------------------------------------------------------------------------------------------------------------------------------------------------------------------------------------------------------------------------------------------------------------------------------------------------------------------------------------------------------------------------------------------------------------------------------------------------------------------------------------------------------------------------------------------------------------------------------------------------------------------------------------------------------------------------------------------------------------------------------------------------------------------------------------------------------------------------------------------------------------------------------------------------------------------------------------------------------------------------------------------------------------------------------------------------------------------------------------------------------------------------------------------------------------------------------------------------------------------------------------------------------------------------------------------------------------------------------------------------------------------------------------------------------------------------------------------------------------------------------------------------------------------------------------------------------------------------------------------------------------------------------- |
| [Account URL](https://docs.snowflake.com/en/user-guide/admin-account-identifier.html) | The [Snowflake account URL](https://docs.snowflake.com/en/user-guide/organizations-connect#connecting-with-a-url), for example: `https://ab12345.us-east-2.aws.snowflakecomputing.com` 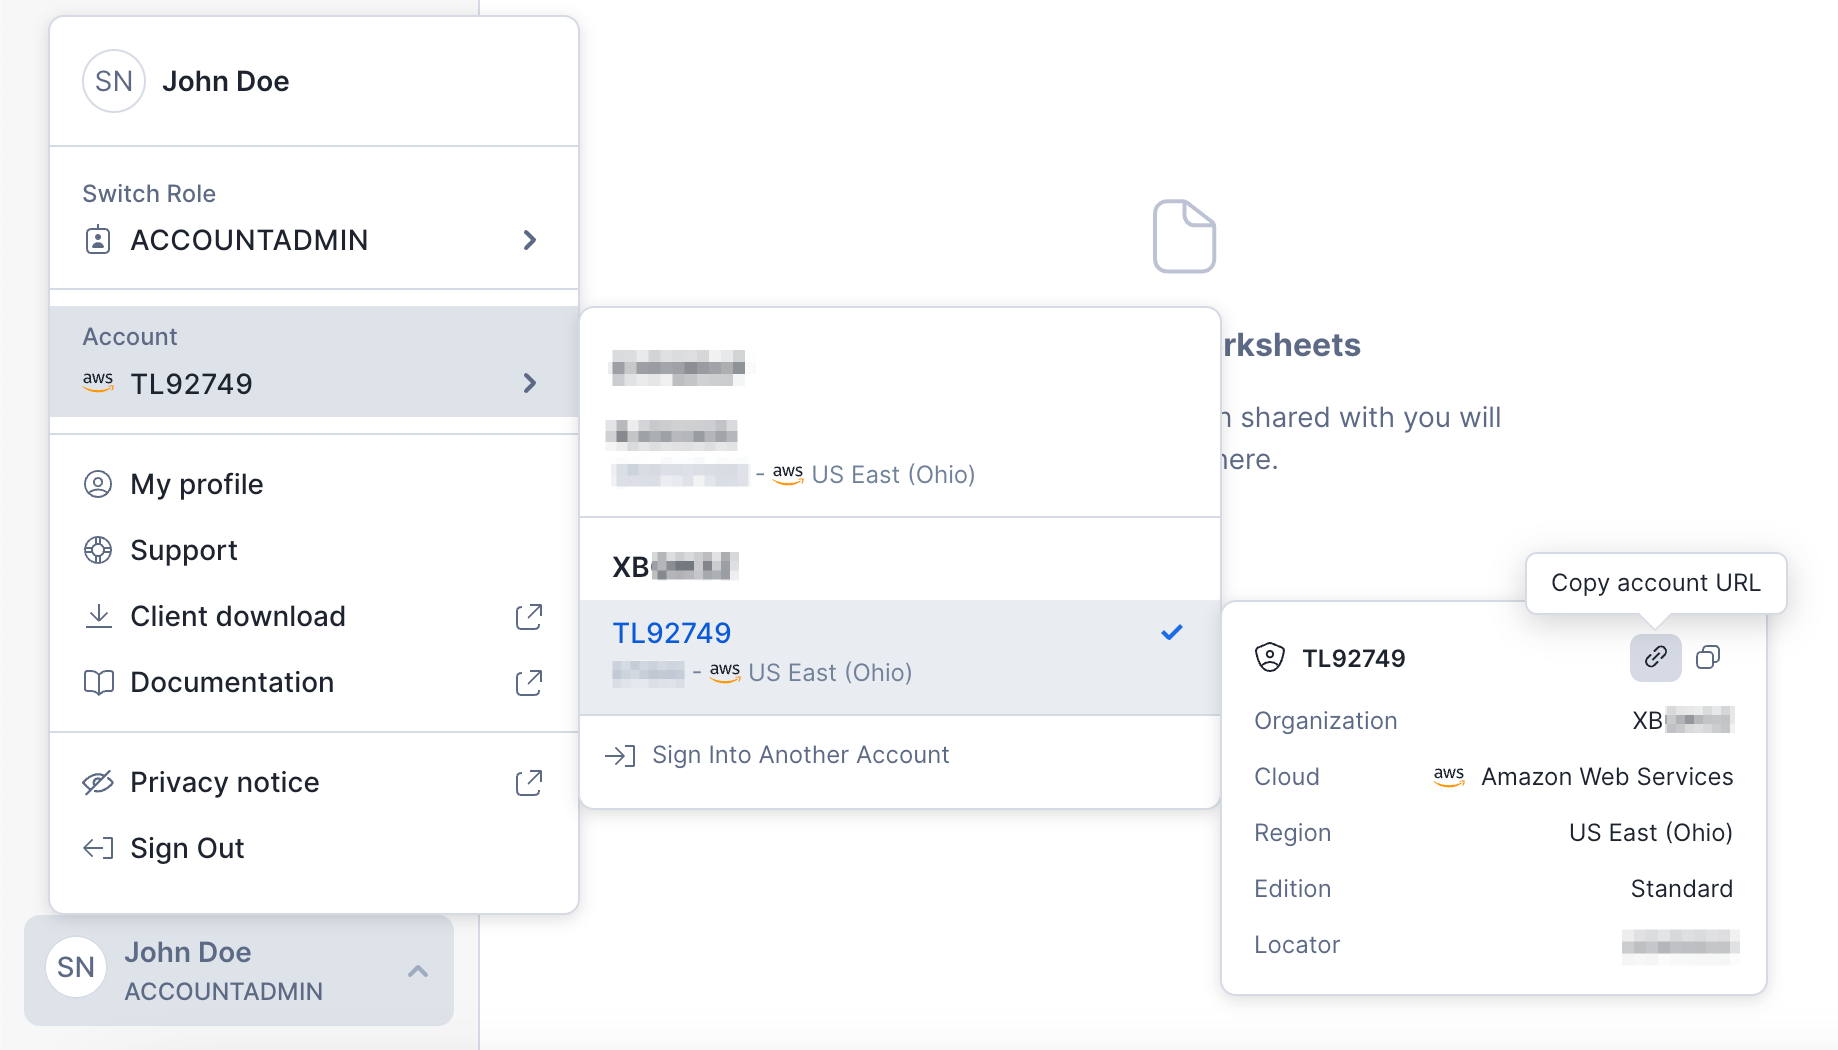 |
| [Role](https://docs.snowflake.com/en/user-guide/security-access-control-overview.html#roles) | The **role** you specified when [creating the Stigg entities in Snowflake](#create-stigg-entities-in-snowflake), for example: `STIGG_ROLE` |
| [Warehouse](https://docs.snowflake.com/en/user-guide/warehouses-overview.html#overview-of-warehouses) | The **warehouse** you specified when [creating the Stigg entities in Snowflake](#create-stigg-entities-in-snowflake), for example: `STIGG_WAREHOUSE` |
| [Database](https://docs.snowflake.com/en/sql-reference/ddl-database.html#database-schema-share-ddl) | The **database** you specified when [creating the Stigg entities in Snowflake](#create-stigg-entities-in-snowflake), for example: `STIGG_DATABASE` |
| [Schema](https://docs.snowflake.com/en/sql-reference/ddl-database.html#database-schema-share-ddl) | The **schema** you specified when [creating the Stigg entities in Snowflake](#create-stigg-entities-in-snowflake), for example: `STIGG_SCHEMA` |
| Username | The **username** you specified when [creating the Stigg entities in Snowflake](#create-stigg-entities-in-snowflake), for example: `STIGG_USER` |
| Private Key | The **private key** you created when generating key-pair |
| Passphrase (optional) | The **passphrase** protects your private key with an extra password. Snowflake recommends following PCI DSS guidelines and storing it securely. |
Click **Connect to Snowflake**.
## Migrating existing connections from password-based to key-pair authentication
If you previously connected Stigg to Snowflake using password-based authentication, you can easily migrate your connection to RSA key-pair authentication without losing access.
In the Snowflake integration card, click Switch to key pair in the banner. This will open the guided migration wizard.
|
| [Role](https://docs.snowflake.com/en/user-guide/security-access-control-overview.html#roles) | The **role** you specified when [creating the Stigg entities in Snowflake](#create-stigg-entities-in-snowflake), for example: `STIGG_ROLE` |
| [Warehouse](https://docs.snowflake.com/en/user-guide/warehouses-overview.html#overview-of-warehouses) | The **warehouse** you specified when [creating the Stigg entities in Snowflake](#create-stigg-entities-in-snowflake), for example: `STIGG_WAREHOUSE` |
| [Database](https://docs.snowflake.com/en/sql-reference/ddl-database.html#database-schema-share-ddl) | The **database** you specified when [creating the Stigg entities in Snowflake](#create-stigg-entities-in-snowflake), for example: `STIGG_DATABASE` |
| [Schema](https://docs.snowflake.com/en/sql-reference/ddl-database.html#database-schema-share-ddl) | The **schema** you specified when [creating the Stigg entities in Snowflake](#create-stigg-entities-in-snowflake), for example: `STIGG_SCHEMA` |
| Username | The **username** you specified when [creating the Stigg entities in Snowflake](#create-stigg-entities-in-snowflake), for example: `STIGG_USER` |
| Private Key | The **private key** you created when generating key-pair |
| Passphrase (optional) | The **passphrase** protects your private key with an extra password. Snowflake recommends following PCI DSS guidelines and storing it securely. |
Click **Connect to Snowflake**.
## Migrating existing connections from password-based to key-pair authentication
If you previously connected Stigg to Snowflake using password-based authentication, you can easily migrate your connection to RSA key-pair authentication without losing access.
In the Snowflake integration card, click Switch to key pair in the banner. This will open the guided migration wizard.
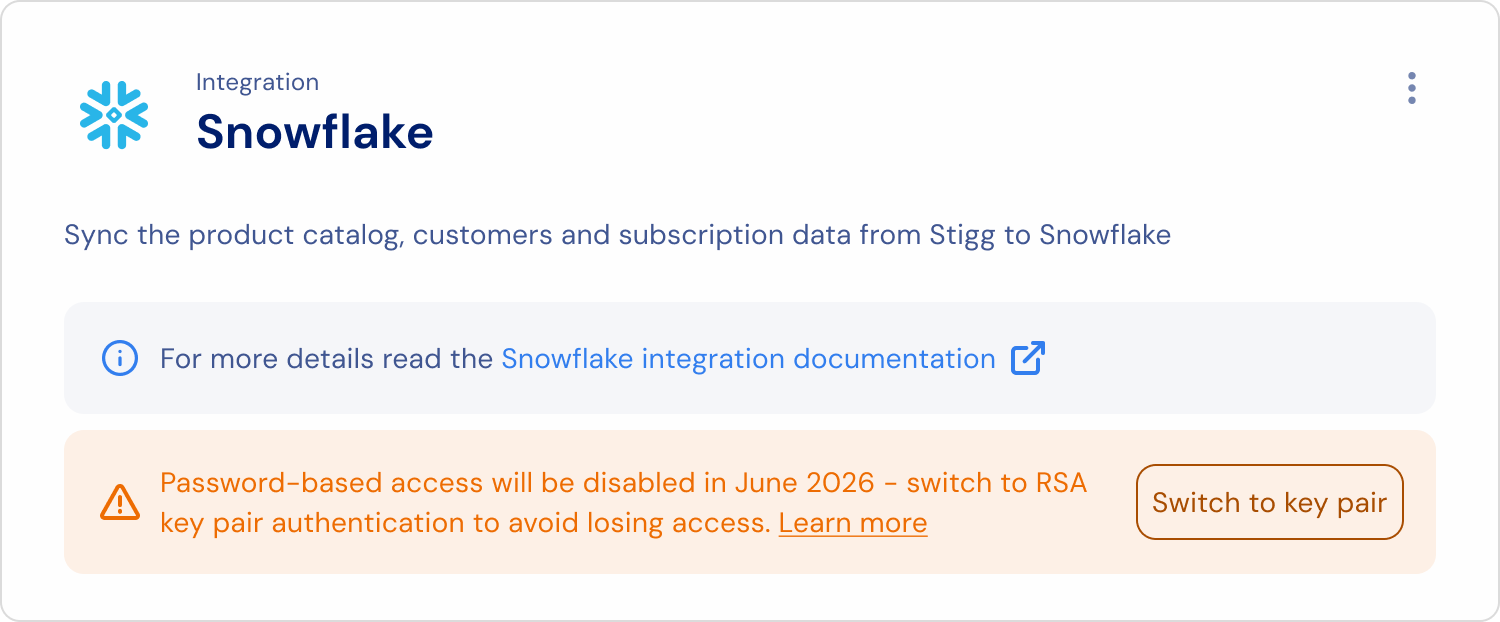 Follow the Generate Snowflake key pair above to create your private and public keys.
Use the script below to update the existing Stigg user and associate your new public key. This script removes password-based authentication and enables key-pair login.
```sql sql theme={null}
-- this script updates the existing user created with password-based authentication
set export_username = 'STIGG_USER';
-- set the public key generated earlier
alter user identifier ($export_username) set rsa_public_key = '';
-- optional: enforce key-pair only by removing the password
alter user identifier ($export_username) unset password;
```
Replace `` with the base64 content of your public key (without the BEGIN/END lines).
Go to connection details.
1. Paste or upload your private key file (rsa\_key.p8).
2. Enter your passphrase (if applicable).
3. Click Update Snowflake connection. Your integration will now use RSA key-pair authentication.
Existing data and sync configuration remain unchanged. Only the authentication method is updated.
## Sync process and frequency
Upon completion of the integration setup, Stigg will perform a full sync of all of the [available data types](#available-data-types).
Subsequent syncs will be incremental; thereby, significantly reducing the amount of data synchronized on a regular basis.
Stigg syncs data to Snowflake on a daily basis at 12:00am UTC.
## Rotating your Snowflake keys (recommended)
Snowflake supports two public key slots for each user:
* `RSA_PUBLIC_KEY`
* `RSA_PUBLIC_KEY_2`
This allows you to rotate keys without downtime.
Follow the same steps as in the **Generate Snowflake key pair** section to create a new private key and public key.
Add the new public key to the secondary key slot:
```sql theme={null}
alter user STIGG_USER
set rsa_public_key_2 = '';
```
In Stigg → Integrations → Snowflake:
1. Upload or paste your new `rsa_key.p8`
2. Enter the passphrase (if applicable)
3. Click **Update Snowflake connection**
Once the connection is validated:
* Swap keys:
```sql theme={null}
alter user STIGG_USER swap rsa_public_key_2 = rsa_public_key;
```
* Or remove the old one:
```sql theme={null}
alter user STIGG_USER unset rsa_public_key_2;
```
Key rotation is a security best practice and recommended for SOC2 / ISO27001 compliance.
## Removing the integration
To remove the integration, click on the dotted menu icon and select the **Remove** action.
Confirm the action by clicking on the **Remove** button in the opened modal.
Follow the Generate Snowflake key pair above to create your private and public keys.
Use the script below to update the existing Stigg user and associate your new public key. This script removes password-based authentication and enables key-pair login.
```sql sql theme={null}
-- this script updates the existing user created with password-based authentication
set export_username = 'STIGG_USER';
-- set the public key generated earlier
alter user identifier ($export_username) set rsa_public_key = '';
-- optional: enforce key-pair only by removing the password
alter user identifier ($export_username) unset password;
```
Replace `` with the base64 content of your public key (without the BEGIN/END lines).
Go to connection details.
1. Paste or upload your private key file (rsa\_key.p8).
2. Enter your passphrase (if applicable).
3. Click Update Snowflake connection. Your integration will now use RSA key-pair authentication.
Existing data and sync configuration remain unchanged. Only the authentication method is updated.
## Sync process and frequency
Upon completion of the integration setup, Stigg will perform a full sync of all of the [available data types](#available-data-types).
Subsequent syncs will be incremental; thereby, significantly reducing the amount of data synchronized on a regular basis.
Stigg syncs data to Snowflake on a daily basis at 12:00am UTC.
## Rotating your Snowflake keys (recommended)
Snowflake supports two public key slots for each user:
* `RSA_PUBLIC_KEY`
* `RSA_PUBLIC_KEY_2`
This allows you to rotate keys without downtime.
Follow the same steps as in the **Generate Snowflake key pair** section to create a new private key and public key.
Add the new public key to the secondary key slot:
```sql theme={null}
alter user STIGG_USER
set rsa_public_key_2 = '';
```
In Stigg → Integrations → Snowflake:
1. Upload or paste your new `rsa_key.p8`
2. Enter the passphrase (if applicable)
3. Click **Update Snowflake connection**
Once the connection is validated:
* Swap keys:
```sql theme={null}
alter user STIGG_USER swap rsa_public_key_2 = rsa_public_key;
```
* Or remove the old one:
```sql theme={null}
alter user STIGG_USER unset rsa_public_key_2;
```
Key rotation is a security best practice and recommended for SOC2 / ISO27001 compliance.
## Removing the integration
To remove the integration, click on the dotted menu icon and select the **Remove** action.
Confirm the action by clicking on the **Remove** button in the opened modal.